1 Get Connected in Minutes
1.1 Genesis Wizard
1.11 What Is It?
The Genesis Wizard is a small interface designed to get you connected to you Internet Service Provider in a few easy steps.
It asks for essential information needed to connect to your provider, dials the number you specify and then negotiates the remaining information automatically.
The Wizard is not a replacement for the Genesis Preferences. The Wizard is designed to offer a "step-by-step" approach to connecting you to the Internet. You could directly configure the Genesis Prefs to get you on the net (and it isn't that difficult) but:
1.12 Specify Interface
In order to make the connection to your Internet Service Provider, you need to tell Genesis the interface you will be using to make this connection. Normally this is either a modem and software interface or network card and driver.
The majority of users will use a modem and PPP interface. This means they are using a modem to dial their provider and using a PPP interface to form the TCP connection
Note: the rest of the Wizard documentation describes connecting to your provider using a modem. If you need further information about connecting the Wizard via a network card or other SANA-II driver, please read the Genesis Preferences documentation.
Choose Use a modem and then press "next" to continue.
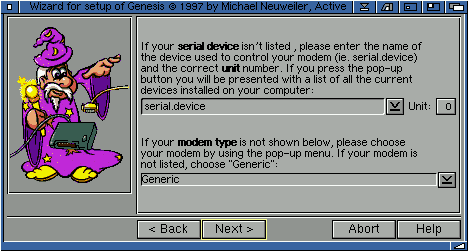
1.13 Choose Your Modem

Note: the internal Amiga "serial.device" is quite buggy, especially when using with an 060 or PPC board in your computer. You could use a replacement device such as the "8n1.device" or "artser.device", both can be used with the internal Amiga serial port.Obviously the best solution would be some kind of replacement serial port: this could be a Hypercom card, Whippet/Surf Squirrel or other buffered port. The BoXeR motherboard, for example, contains a built in serial buffer, which means that there should be no need for a serial card in a BoXeR (or similar) based Amiga.
We also suggest you limit the numbers of colours you use on your screen (and hacks used on your system) when using the normal serial.device and/or Amiga serial port. If you use more than 64 colours you might find you either can't connect or have modem problems once connected.
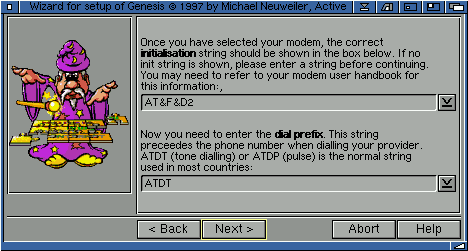
1.14 Extra Modem Information

Some useful strings that may be used:
| Command | Function |
|---|---|
| &C0 | Force RLSD active regardless of the carrier state. |
| &C1 | Allow RLSD to follow the carrier state. |
| %C0 | Disable data compression. |
| %C1 | Enable MNP 5 data compression. |
| %C2 | Enable V.42 bis data compression. |
| %C3 | Enable both V.42 bis and MNP 5 compression. |
| &D0 | Interpret DTR ON-to-OFF transition per &Qn: &Q0, &Q5, &Q6 The modem ignores DTR. |
| &D1 | Interpret DTR ON-to-OFF transition per &Qn: &Q0, &Q5, &Q6 Asynchronous escape. |
| &D2 | Interpret DTR ON-to-OFF transition per &Qn:&Q0, &Q5, Q6 The modem hangs up. |
| &D3 | Interpret DTR ON-to-OFF transition per &Qn:. &Q0, &Q5, &Q6 The modem performs soft reset. |
| E0 | Turn off command echo. |
| E1 | Turn on command echo. |
| %E0 | Disable line quality monitor and auto retrain. |
| %E1 | Enable line quality monitor and auto retrain. |
| %E2 | Enable line quality monitor and fallback/fall forward. |
| F0 | Select auto-detect mode (equivalent to N1). |
| &K0 | Disable DTE/DCE flow control. |
| &K3 | Enable RTS/CTS DTE/DCE flow control. |
| &K4 | Enable XON/XOFF DTE/DCE flow control. |
| &K5 | Enable transparent XON/XOFF flow control. |
| &K6 | Enable both RTS/CTS and XON/XOFF flow control. |
| L0 | Set low speaker volume. |
| L1 | Set low speaker volume. |
| L2 | Set medium speaker volume. |
| L3 | Set high speaker volume. |
| M0 | Turn speaker off. |
| M1 | Turn speaker on during handshaking and turn speaker off while receiving carrier. |
| M2 | Turn speaker on during handshaking and while receiving carrier. |
| M3 | Turn speaker off during dialing and receiving carrier and turn speaker on during answering. |
| W0 | Report actual baud rate connection (ie. 57600) |
| W1 | Report line speed, EC protocol and DTE speed. |
| W2 | Report actual connection speed (ie. 48K) |
An example of a standard/simple initialisation string is "AT&F&D0W2".
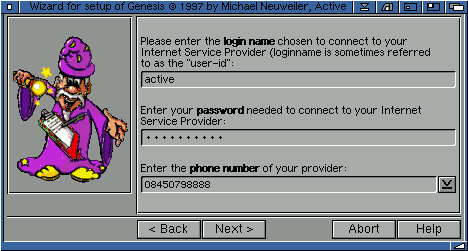
1.15 User Information

When you first setup your account, you would have given your ISP a password you want to use or they will have assigned you a password. If you were given a password, it may look something like "wa1BcP5" or equally as strange looking.
Note: that you must enter your loginname and password correctly. ie. if your loginname is in lowercase, don't enter it in uppercase! Also, sometimes your password may be a mixture of uppper and lower case charaters.
If you enter an incorrect loginname or password Genesis will warn you that the info you entered was not correct and you will not be connected to your Internet Service Provider.
These multiple phone numbers must be seperated with a pipe "|". ie. "08451234567|08457654321".
1.16 Interface Information

If you are unsure if your provider needs a loginscript, try dialing without a script and see if this is successful. ie. leave the Wizard to "no, go online immediately (PAP/CHAP)".
1.17 Dialing Provider

Now you have entered the relevant you will need to dial your provider to allow the Wizard to gather the remaining information automatically.
This page has tow functions:
Firstly press "dial" as shown in the interface. Genesis will dial the number you entered previously and will connect. If you chose "no, go online immediately (PAP/CHAP)" in the previous window, Genesis will go online, without any further prompts and will gather relevant information.
However, if you selected "yes, use a login script after dialing" you will be required to perform certain actions in order to login to your provider.
Your provider will prompt you with certain "questions". For instance:
Login:
[you press the "send login"  button]
Password:
[you press the "send password"  button]
HELO
[you press the "go online"  button]
The Wizard will record this login procedure. If this login is not successful then simply press "hang up and re-try, using a different technique. Remember many modern/large or new ISP's do not require a loginscript, so you may only be required to enter "dial" and "go online".
1.18 Success!

If everything went well and the Wizard obtained all necessary information, you should be presented with this final page.
Once you are happy with this page, press "finish" to leave the Genesis Wizard and the configuration files will be saved to your hard drive.
Note: that this configuration file will be saved to your hard drive and when you run the Genesis Preferences the configuration will be automatically imported. You will be able to rename the configuration and make further changes, although these are not necessary, via the Genesis Preferences.
Go to the previous, next, chapter, table of contents.